PoiPointer, View Depth Override and Destination BIM
Originally Published inThree topics for today:
Brussels Hackathon and PoiPointer
I returned from the Hackathon Open Data Brussels ↗ that I mentioned last Friday, promoting the use of the huge amounts of open data, cf. this impressive list of available data sets ↗.
As said, I participated in the PoiPointer ↗ project, with a goal of implementing an app pointing out points of interest of various categories in Brussels, e.g. museums, cultural places, monuments, sculptures, fountains, murals, etc.
We used the schema-less REST driven JSON-based ElasticSearch ↗ database and Java for the back end database, node.js ↗ and JavaScript for the web server, Objective-C for the iOS mobile app, Python for database clean-up and verification and HTML with GitHub in-place website hosting for the project home page.
Here is the project home page and all its GitHub repositories:
-
PoiPointer marketing ↗, i.e. images, icons, etc.
-
PoiPointer node.js server ↗ (JavaScript)
-
Back end used to sync db ↗ with opendata.brussels.be ↗ (Java)
-
PoiPointer iOS app ↗ (Objective-C)
-
Home page sources ↗ (HTML)
-
HackaBXL ↗, the official Brussels Open Data hackathon organisation
I learned lots of new things and will definitely take a closer look soon at implementing some simple cloud-connected database search engine connected with Revit BIM collection using node.js and ElasticSearch.
I love the GitHub web hosting functionality and will certainly make frequent continued use of that as well.
View Depth Override
I received an email asking whether it might be possible to implement a perception of depth on elevation and section views:
Question: I am struggling to provide an automatic perception of depth on elevation and section views.
I would like the objects in the front to be displayed in black and white like Revit normally does. Everything in the background should be a grey of sorts, and the further back, the lighter the grey.
Here is an illustration of what I mean:
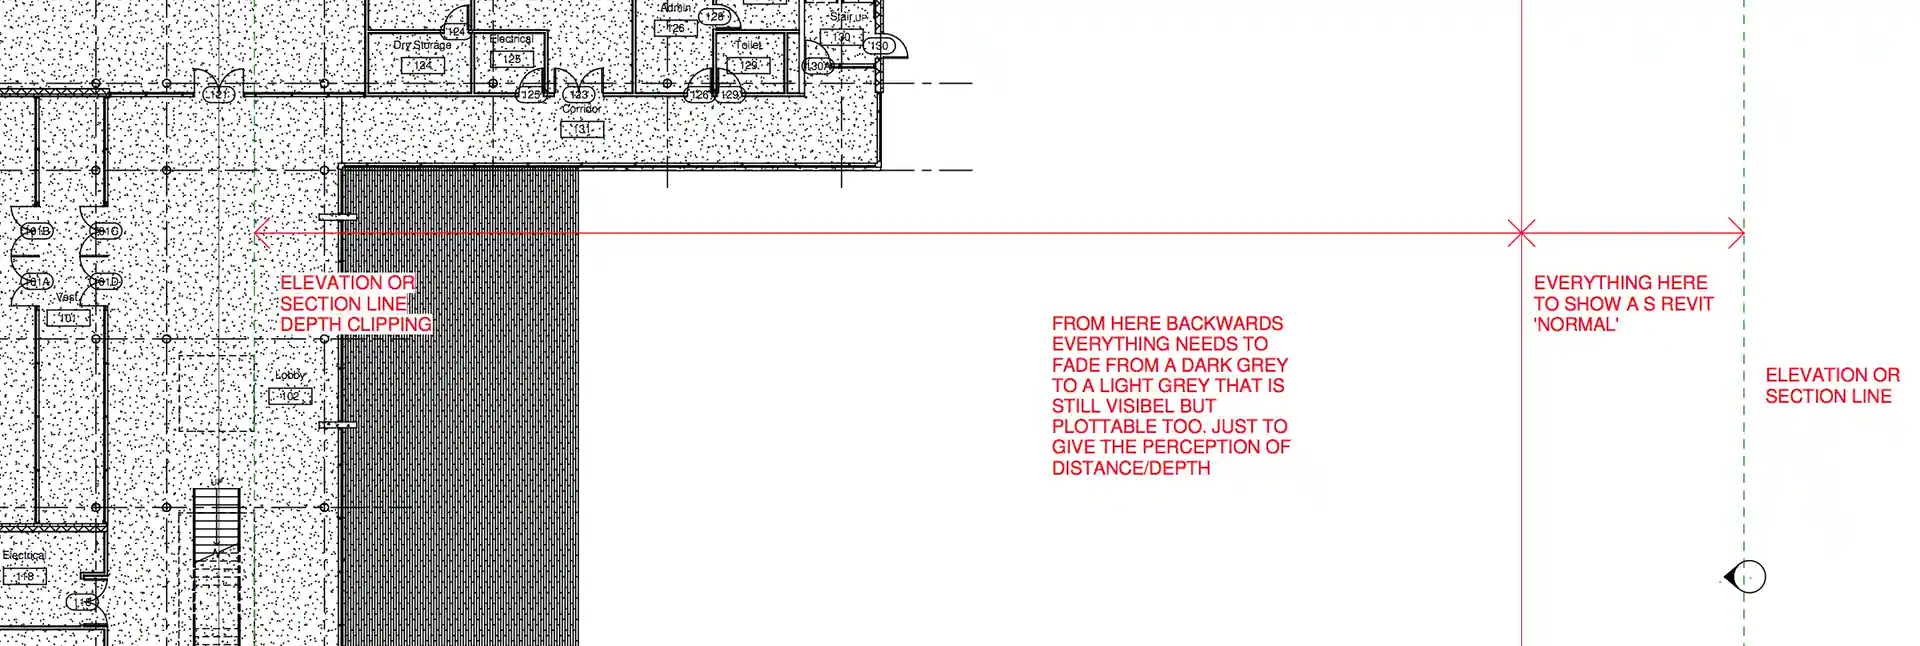
- From the section or elevation line, I would like to define a distance or area where everything would show black & white like Revit normal. This distance or depth can be adjusted.
- Further back from the Revit normal area until you reach the depth clipping line, I would like to make a setting that overrides the normal display and allows the user to set a starting grey and an end grey ranging from dark to light. It would be nice if the element projection line thickness could be overridden in the same way.
Here is a discussion on whether Revit elevation views are leaving you flat ↗ that might help provide a better explanation of the end result that I am looking to achieve.
I have no knowledge of the Revit API or add-in programming. Do you think that this is possible?
Can this be achieved using API or through an add-in?
Answer: You are in luck, especially since you say that you are not an experienced add-in programmer yourself.
I once happened to notice an add-in that does exactly what you are asking for.
It was published on an Italian blog, though.
I spent quite a while digging around for it and was initially still not able to find it or any way to pick it out from the mass.
Searching for “italian add-in” obviously did not help, and I could not imagine what it would.
Later…
I spent some more time on this and finally found a suitable search term: revit macro distanzia ↗ led to puntorevit.blogspot.com ↗, and that in turn led to the mention I had in mind, on the view depth override macro by Paolo Emilio Serra.
I browsed through inpuntorevit ↗ a bit more and even discovered a recent update of the view depth override external command ↗ for Revit 2015.
By the way, Paolo switched from Italian to English language blogging now, which may or may not simplify things for you, depending on your language preferences :-)
Destination BIM Contest
Are you a BIM champion?
Enter the Destination BIM contest ↗ and win the chance to attend Autodesk University 2014.
Contest Details
-
When: Content runs from October 17, 2014 until November 3, 2014.
-
Who can enter: Anyone using or interested in BIM! Winner is open to US and Canada only.
-
How to enter: Contestants fill out form and tell us how their BIM pilot is helping to change their organization on the dedicated contest landing page.
-
How to win: winner selected by Autodesk committee by November 7, 2014.
-
The Prize: 4 winners. Each receives one pass to Autodesk University Las Vegas, $600 travel voucher and hotel stay.
-
Fine print:
-
Contestants grant Autodesk permission to use their submission materials and interview content captured at AU
-
Winners must participate in interviews and appear in video at AU per schedule determined by Autodesk